Saturday, June 30, 2012

Must Have - The Ikea Expedit

There are so many things you could do with this shelf.  It comes in many different sizes too.  I really love this idea (especially since I love chalkboard paint right now).  It may fit perfectly in my office with just 2 of the shelves.  
Picture from:  thesmithnest.blogspot.com

I love the fabric they chose to put on this shelf.  It would look great with the white or light wood shelf I plan to buy.  
Picture from:  Pinterest.com

This is just adorable.  What a great way to use the skinnier Expedit shelf.
Picture from:  apartmenttherapy.com

A wall of Expedit's may look good in the office.  Not sure if I need that many though.
Picture from:  bhg.com

I love this idea.  I don't have many usable walls, so I could do this possibly on one unusable wall (because there is a vent on the floor that can't be blocked).
Picture from:  seejanework.com

What a great idea!  They put scrapbook paper or wallpaper on the back of the shelf to add a detailed touch.  Very pretty!
 Picture from:  Pinterest.com

This is one of my all time favorites.  I would love to have this room and all the supplies in it!!!
 Picture from:  Pinterest.com

Love the white and the rainbow order.  :)
Picture from:  Pinterest.com

This works for me because I am sticking with whites, browns, and grays for the office.  Very pretty!
Picture from:  Pinterest.com

I'm not sure exactly what I will do yet with these shelves, but I hope it will be functional and cute!  Most of all, I just want our home office to be a comfortable place to work and do art projects.  I have been hinting around to my husband about building me some of these shelves.  He built me some already that I use for cubbies at the school.  He is ignoring me.  :)  Something will work out, but for me the nearest Ikea is 6 hours away.  I have already gotten 3 separate friends to buy things off of my Ikea list for me.  I will post pictures when I get the office layout finished.

Friday, June 29, 2012

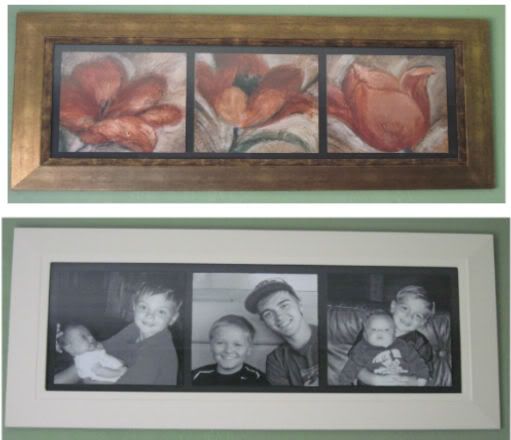
Tulip Picture Turned Family Photo Frame

My frame project before and after!!!

Here is what I started with.

I first had to cut down all of the posters to fit on the 12 X 12 mount.

 I ordered poster size prints from Snapfish.com of my kids. I dismantled the tulip frame and ripped the tulip pictures off of their mounts.  Then I used Mod Podge to paint over the pictures.

 I followed the same procedure for each picture.


 After letting the Mod Podge dry I painted a layer of dark grey around each of the pictures (on the black area).  This also helped hide areas where I was unable to cut perfectly straight.  I just painted in the mistake areas around the edges and you could not even tell.
 So I went from this....

To this!!!!  This is going to look great in the new house.

Thursday, June 28, 2012

Pinterest Inspired Framed TV

This is the perfect idea for our bedroom TV that will be mounted on the wall.  There are lots of variations of framed TV's.  I think we will do ours with a thick off-white frame that matches our trim.  LOVE this idea!!!

Picture from:  http://www.fopple.com/tag/flat-panel-tv-frames-for-beautiful-decorating-ideas/

 Picture from:  http://adreamhousefortrish.blogspot.com/2010/12/fancy-faux-fireplace.html


Picture from:  http://www.allthingsthrifty.com/2011/07/feature-friday-surprise-makeover.html

Picture from:  http://www.remodelaholic.com/2012/02/framing-in-a-wall-mount-television/

New Find

I found these pretty panels at The Container Store!  They are on the way.  I can't decide if I want them in the bedroom or the office.  Probably the office though in a pattern.  

Organizing My Bracelets

The huge task of tackling all of my jewelry is finally coming together.  Today I got my next package from The Container Store!!!  Ahhhh......it is actually bigger than it looks.  It's about a foot tall and holds a TON of stuff!!!


 Here is part of my messy jewelry drawer.  Three drawers look like this!


 This is part of my large jewelry box (the stand up kind).  There are 5 drawers like this.  Ugh!


Look how pretty it is now!


Another view.  I have another organizer coming in the mail too and some wall hook ideas for when my closet gets finished for a bunch of the necklaces.  Also, I think it is time to get rid of some things that I don't wear.


By the way, did I already say how much I LOVE the Container Store??  :)

My Husband is Amazing!

My husband is a building contractor.  He has managed to build our house in a year while working on building houses for other people at the same time.  He just started a brand new home a few weeks ago.  It is not unusual to see him working outside at 10:30 with a head lamp on.  He takes pride in building nice custom homes.  He is honest and I am proud of him for all of his hard work and dedication.  He has spent the last year working on our house, mostly in the evenings after his other job.  I can't wait to share finished photos of the house with you all!
 The fireplace extends from the family room to the upstairs.  Our friend Joe did the fireplace for us and I LOVE it!  It is the centerpiece of our house.

 Joe and my husband just finished the entryway.  It is travertine that extends all the way through to the guest bathroom.  It is much more beautiful in person.

This was a fantastic find at Home Depot!  I really wanted industrial lighting for my kitchen.  I love the industrial look.  The pendant lights I found online were $300 each!!!  We definitely could not swing that.  I was on a mission to find the same ones (or close to it), but for half the price.  Well, I found them and they were only $99 each!!!  I got 2 to go over the bar in the kitchen.  They look fantastic.

Wednesday, June 27, 2012

My Newest Frame Project

I have found many, many great ideas from Pinterest.  That is another thing I am obsessed with right now.  One of the neat things on there is a wall of black and white photos in frames.  I plan on doing a big mural type thing as you walk up the stairs in the new house.  I will have it in order from when my kids were the youngest to their current pictures.  I have been gathering my favorite family pictures since school ended to make the perfect wall.  On a side note, I wanted a picture frame in my bedroom of my 3 favorite pictures of my boys.  I was on the lookout for a large frame.  I just didn't want to spend a lot of money.  That's when I saw this picture on my wall.  I have been wanting to get rid of it for a while, well because the frame is gold!  I came up with an idea.


 Dismantle the whole picture frame.

 Tear off the pictures of the tulips.

 Paint the frame the same color as the trim in my house.

I had to use 3 coats.  Now, I am not quite finished.  I went onto Snapfish.com and ordered some poster size prints of my favorites photos of my kids.  They should be here on Monday so I can finish the project.  I plan on cutting the pictures to a 12 inch by 12 inch size and using Mod Podge to put them over where the tulips used to be.  Hopefully it will turn out just as I hope it will.  I will post pictures next week of the finished product!!

Organizing the New Office One Basket at a Time

I go to the Dollar Tree quite a bit.  As a teacher you find a ton of things you can use in your classroom.  I happened to see these a few weeks ago and I knew I could do something with them.


 I decided to drill holes in them and sand them down.

 Then I painted them with chalkboard paint.  I used three coats on the front and the back.

 Then I used jute string .........

 ...and prepared them for my office.

I had some cute baskets that I plan on filling with supplies soon.  I knew I needed to label them somehow.  I often change things around a lot, so permanent labels would not work.  I needed labels that I could erase a rewrite on if needed.  These are perfect and cute too!  Total cost including the baskets = $5.99 per basket (Ross), $1.00 package of wooden flowers (Dollar Tree), and $3.99 chalkboard paint (Fred Meyer).  Grand total = $22.96.

I LOVE the Container Store!

My new obsession is The Container Store.  LOVE IT!!  Here is one of my recent purchases.  We always have batteries laying around everywhere.  If my kids can't find the batteries they need, they will take them out of our remotes to the TV.  Then when I sit down to watch TV at the end of the day with my blanket and I get all comfortable......the remote won't work!  So, I knew I needed to find a good battery container.  The Container Store had just the thing for me!
I bought 2 battery storage boxes.  One is for all batteries (except 9 Volt, but I put them in there anyway). The other one is for AA batteries, which is the type my kids use the most for their electronics.
See how organized it is???  :)  This makes me happy.

Desk Organizer Turned Paint Supply Organizer

I had this old desk organizer in my storage room.  It was too deep for my desk at work, so I ended up just storing it away thinking it will come in handy some day.  Well, I found a way to use it.  I turned it into a craft paint organizer!  

A Junk Drawer No More!

I am determined to get rid of clutter and start brand new!  During the school year I let some things slide.  My junk drawer was one of those things that I let go WAAAAYYYYY TOOOO LOOONNNGG!!  I am not even sure what that metal brush in the back is for - lol!

Uhhh...yeah!  This is seriously the contents of my two junk drawers.  Gross I know!  So I went from this....
 to this!  Here is the nail/screw drawer
Here is the painters drawer.
And here is the organizer I used.  This is a rolling cart I used for scrapbooking.  It doesn't match my office, so I got a new one that is bigger and has clear drawers instead.  I knew I could use this organization cart for something!  It's home will be in the garage, which is attached to my dining room.  It will be easy to pop in there and get the things I need without having a kitchen drawer full of all of these supplies.  The only thing I am missing are labels for each drawer.  I will do that after I finish adding all the items I find around the house that need a home.

LinkWithin

Related Posts Plugin for WordPress, Blogger...